How to Clean an Electric Motor: A Comprehensive Guide
Electric motors are the workhorses of countless machines, from household appliances to industrial equipment. Over time, these motors accumulate dust, dirt, grease, and other contaminants, which can significantly impact their performance and lifespan. Knowing how to clean an electric motor properly is essential for maintaining efficiency, preventing overheating, and avoiding costly repairs or replacements. This comprehensive guide will walk you through the necessary steps, safety precautions, and best practices for keeping your electric motors running smoothly.
Why Cleaning Your Electric Motor Matters
Ignoring the buildup of contaminants in an electric motor can lead to several problems:
- Reduced Efficiency: Dirt and grime act as insulators, preventing the motor from dissipating heat effectively. This leads to increased energy consumption and decreased performance.
- Overheating: Excessive heat can damage the motor’s windings and insulation, leading to premature failure.
- Bearing Damage: Contaminants can infiltrate the bearings, causing increased friction, noise, and wear.
- Increased Downtime: Motor failures result in downtime, which can be costly in industrial settings.
- Safety Hazards: Overheated motors can pose a fire risk.
Regular cleaning, therefore, is a crucial part of preventative maintenance that ensures reliable operation and extends the life of your electric motor.
Safety First: Precautions Before Cleaning
Before you begin, safety should be your top priority. Follow these precautions:
- Disconnect the Power: Always disconnect the motor from its power source before cleaning. Lockout/tagout procedures should be followed in industrial environments to prevent accidental energization.
- Allow Cooling: Let the motor cool down completely before starting the cleaning process. Hot surfaces can cause burns.
- Wear Appropriate PPE: Wear safety glasses, gloves, and a dust mask to protect yourself from dust, debris, and cleaning chemicals.
- Work in a Well-Ventilated Area: Some cleaning solvents can release harmful vapors, so work in a well-ventilated area or use a respirator.
- Consult the Motor’s Manual: Refer to the motor’s manual for specific cleaning recommendations and warnings.
Tools and Materials You’ll Need
Having the right tools and materials will make the cleaning process more efficient and effective. Here’s a list of essentials:
- Vacuum Cleaner with Brush Attachment: For removing loose dust and debris.
- Soft Brushes: Various sizes for cleaning hard-to-reach areas.
- Clean Rags or Lint-Free Cloths: For wiping surfaces.
- Cleaning Solvents: Choose a solvent appropriate for electric motors. Options include:
- Electrical Contact Cleaner: Specifically formulated for electrical components.
- Isopropyl Alcohol: A good general-purpose cleaner.
- Motor Cleaner: Designed to remove grease and grime.
- Compressed Air (Optional): For blowing out dust and debris from tight spaces.
- Degreaser (Optional): For stubborn grease and oil deposits.
- Screwdrivers and Wrenches (Optional): For disassembling the motor if necessary.
Step-by-Step Guide to Cleaning an Electric Motor
Step 1: Visual Inspection and Preparation
Start by visually inspecting the motor for any obvious damage, such as cracked housings, frayed wires, or damaged bearings. Note any areas with heavy buildup of dirt or grease. This will help you focus your cleaning efforts. Ensure that the motor is disconnected from power and completely cooled down.
Step 2: Removing Loose Debris
Use a vacuum cleaner with a brush attachment to remove loose dust, dirt, and debris from the motor’s exterior. Pay close attention to the cooling fins, vents, and other areas where contaminants tend to accumulate. A soft brush can also be used to loosen stubborn debris before vacuuming. Compressed air can be used with caution to blow out dust from hard-to-reach areas, but be careful not to force debris further into the motor’s internal components.
Step 3: Cleaning with Solvents
Apply the chosen cleaning solvent to a clean rag or lint-free cloth. Avoid spraying the solvent directly onto the motor, as this can cause it to seep into sensitive components. Gently wipe down the motor’s exterior, paying attention to areas with grease or grime. For stubborn deposits, you may need to apply a degreaser first and let it soak for a few minutes before wiping it away. Ensure that the solvent is compatible with the motor’s materials and does not damage any plastic or rubber components. Use a specialized electrical contact cleaner for any electrical connections or components.
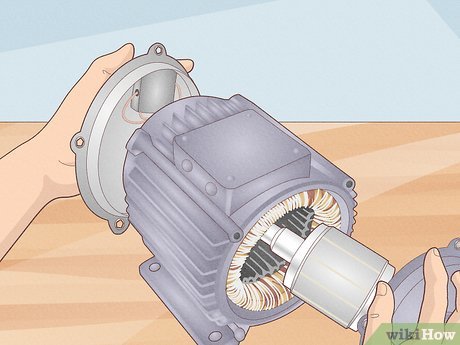
Step 4: Cleaning the Motor’s Interior (If Applicable)
In some cases, it may be necessary to clean the motor’s interior. This typically involves disassembling the motor, which should only be done if you are comfortable with the process and have the necessary tools and expertise. Before disassembling the motor, take pictures or make notes of the wiring and component placement to ensure that you can reassemble it correctly. Once the motor is disassembled, use a vacuum cleaner and soft brushes to remove any loose debris from the internal components. Clean the windings with a clean rag dampened with a suitable solvent. Be careful not to damage the insulation on the windings. Clean the bearings with a degreaser and re-lubricate them with the appropriate grease before reassembling the motor. [See also: Electric Motor Maintenance Tips].
Step 5: Drying and Reassembly
Allow the motor to dry completely before reassembling it or reconnecting it to power. You can use compressed air to speed up the drying process. Once the motor is dry, carefully reassemble it, following your notes or pictures. Ensure that all connections are secure and that all components are properly aligned. If you replaced any bearings, make sure they are properly lubricated.
Step 6: Testing and Inspection
Before putting the motor back into service, test it to ensure that it is running smoothly and efficiently. Check for any unusual noises or vibrations. Use a multimeter to check the motor’s windings for shorts or open circuits. If you notice any problems, consult a qualified electrician or motor repair technician. Regular cleaning of your electric motor will prevent future issues. Understanding how to clean an electric motor is essential for extending its lifespan.
Choosing the Right Cleaning Solvent
Selecting the appropriate cleaning solvent is crucial to avoid damaging the motor’s components. Consider these factors:
- Material Compatibility: Ensure the solvent is compatible with the motor’s materials, including plastics, rubber, and insulation.
- Flammability: Choose a non-flammable solvent to minimize the risk of fire.
- Toxicity: Opt for a solvent with low toxicity to reduce health hazards.
- Residue: Select a solvent that leaves minimal residue after evaporation.
Commonly used solvents include electrical contact cleaner, isopropyl alcohol, and specialized motor cleaners. Always follow the manufacturer’s instructions and safety precautions when using any cleaning solvent. Cleaning an electric motor regularly can significantly improve its performance. Knowing how to clean an electric motor properly is a valuable skill.
Preventative Measures for a Cleaner Motor
In addition to regular cleaning, there are several preventative measures you can take to keep your electric motors cleaner and extend their lifespan:
- Enclosure: Use an enclosed motor to protect it from dust, dirt, and moisture.
- Filtration: Install air filters to prevent contaminants from entering the motor’s environment.
- Regular Inspections: Conduct regular visual inspections to identify and address potential problems early on.
- Proper Lubrication: Ensure that bearings are properly lubricated to prevent wear and tear. [See also: Understanding Motor Bearing Lubrication].
- Vibration Analysis: Perform vibration analysis to detect early signs of bearing failure or other mechanical problems.
Troubleshooting Common Issues
Even with regular cleaning and maintenance, you may encounter some common issues with your electric motor. Here are some troubleshooting tips:
- Motor Overheating: Check for blocked vents, excessive load, or winding shorts.
- Motor Not Starting: Check the power supply, wiring connections, and motor windings.
- Excessive Noise or Vibration: Check for loose bearings, unbalanced rotor, or mechanical damage.
- Motor Running Slowly: Check for low voltage, excessive load, or worn bearings.
If you are unable to resolve the issue yourself, consult a qualified electrician or motor repair technician. Keeping your electric motor clean is crucial for preventing these problems. Learning how to clean an electric motor effectively contributes to its longevity. Understanding how to clean an electric motor is a worthwhile investment in your equipment.
Conclusion
Cleaning an electric motor is a straightforward but essential maintenance task. By following the steps outlined in this guide and taking the necessary safety precautions, you can keep your electric motors running efficiently and reliably for years to come. Regular cleaning not only improves performance but also prevents costly repairs and extends the lifespan of your valuable equipment. Remember that understanding how to clean an electric motor is a fundamental skill for anyone working with machinery. This comprehensive guide on how to clean an electric motor should give you the confidence to tackle this important task. Proper maintenance, including knowing how to clean an electric motor, will save you time and money in the long run. Regularly cleaning your electric motor is a proactive approach to equipment maintenance. The process of how to clean an electric motor ensures optimal performance. This guide details how to clean an electric motor for various applications.
