How to Remove Surface Rust on Your Car: A Comprehensive Guide
Surface rust is a common problem for car owners, especially those living in areas with harsh weather conditions or high levels of road salt. While it might seem like a minor issue, neglecting surface rust can lead to more significant and costly damage down the line. This comprehensive guide will walk you through the process of how to remove surface rust on car paint and metal parts, ensuring your vehicle stays in top condition. Ignoring rust can lead to structural problems, so addressing it early is crucial. We will cover everything from identifying surface rust to choosing the right tools and techniques for effective removal.
Understanding Surface Rust
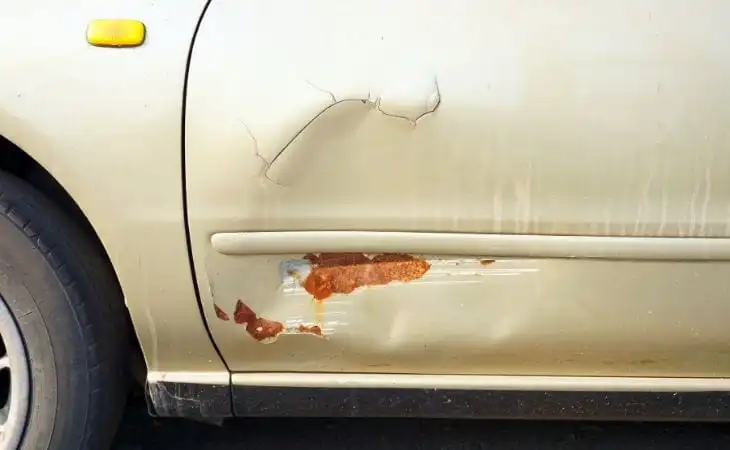
Before diving into the removal process, it’s essential to understand what surface rust is and how it differs from more severe forms of corrosion. Surface rust, also known as oxidation, is the initial stage of rust formation. It appears as a reddish-brown discoloration on the surface of the metal. This happens when iron or steel reacts with oxygen and moisture in the air. Unlike deeper rust that eats into the metal’s structure, surface rust only affects the outermost layer.
Identifying surface rust early is key to preventing it from spreading and causing more extensive damage. Look for small spots or patches of discoloration, especially in areas prone to moisture accumulation, such as wheel wells, door seams, and undercarriage. Regular inspection of these areas can help you catch surface rust before it becomes a bigger problem. Knowing how to remove surface rust on car parts is therefore a vital skill for car owners.
Tools and Materials You’ll Need
To effectively remove surface rust on car surfaces, you’ll need a few essential tools and materials. Having these items on hand will make the process smoother and more efficient:
- Safety Glasses and Gloves: Protecting yourself is paramount. Rust particles and chemicals can irritate your skin and eyes.
- Cleaning Supplies: Car wash soap, water, and a clean microfiber cloth.
- Sandpaper: Various grits (e.g., 220, 400, 600) for removing rust and smoothing the surface.
- Rust Remover: Chemical rust removers or converters are available at auto parts stores.
- Wire Brush: For scrubbing away loose rust particles.
- Primer: To protect the bare metal after rust removal.
- Car Paint: Matching your car’s color for a seamless finish.
- Clear Coat: To protect the paint and provide a glossy finish.
- Masking Tape: To protect surrounding areas from overspray.
- Clean Rags: For wiping surfaces and applying products.
Step-by-Step Guide to Removing Surface Rust
Now that you have your tools and materials, let’s go through the step-by-step process of how to remove surface rust on car:
Step 1: Cleaning the Affected Area
Before you start removing rust, thoroughly clean the area around it. Wash the car with car wash soap and water, paying close attention to the rusted spot. Rinse well and dry with a clean microfiber cloth. This will remove any dirt, grime, or debris that could interfere with the rust removal process. A clean surface ensures the rust remover or sandpaper works effectively.
Step 2: Sanding the Rust
Using sandpaper is a common method for how to remove surface rust on car. Start with a coarser grit (e.g., 220) to remove the bulk of the rust. Gently sand the rusted area, applying light pressure. Avoid pressing too hard, as this could damage the surrounding paint. As you remove the rust, switch to finer grits (e.g., 400, 600) to smooth out the surface. The goal is to remove the rust and create a smooth base for painting.
Step 3: Applying Rust Remover
If sanding alone doesn’t remove all the rust, or if you prefer a chemical approach, use a rust remover. Apply the rust remover according to the manufacturer’s instructions. Some rust removers require a few minutes to work, while others need to be left on for several hours. After the recommended time, wipe away the rust remover with a clean rag. Be sure to follow all safety precautions when using chemical rust removers.
Step 4: Cleaning and Drying
After sanding or using a rust remover, clean the area again with water and dry it thoroughly. This removes any residue from the rust remover or sandpaper dust. Ensure the surface is completely dry before proceeding to the next step. Moisture can lead to rust formation under the new paint, so drying is crucial.
Step 5: Applying Primer
Primer is essential for protecting the bare metal and providing a good base for the paint. Apply a thin, even coat of primer to the sanded area. Use masking tape to protect the surrounding paint from overspray. Allow the primer to dry completely according to the manufacturer’s instructions. Primer helps the paint adhere better and prevents future rust formation.
Step 6: Painting
Once the primer is dry, apply a thin, even coat of car paint that matches your car’s color. Shake the paint can well before use and hold it about 8-12 inches away from the surface. Apply multiple thin coats rather than one thick coat to prevent drips and runs. Allow each coat to dry completely before applying the next. Matching the paint color ensures a seamless repair.
Step 7: Applying Clear Coat
After the paint is dry, apply a clear coat to protect the paint and provide a glossy finish. Apply a thin, even coat of clear coat, following the same technique as with the paint. Allow the clear coat to dry completely. Clear coat protects the paint from scratches, UV damage, and environmental elements.
Step 8: Polishing and Buffing (Optional)
For an even more professional finish, you can polish and buff the repaired area. Use a polishing compound and a soft cloth to polish the surface. Then, use a buffing compound to buff the surface to a high shine. Polishing and buffing blend the repaired area with the surrounding paint, making it virtually undetectable.
Preventing Future Rust
Knowing how to remove surface rust on car is important, but preventing it in the first place is even better. Here are some tips to help prevent future rust:
- Regular Washing: Wash your car regularly, especially during winter when road salt is prevalent.
- Waxing: Apply wax to your car’s paint to protect it from moisture and environmental elements.
- Undercoating: Consider applying an undercoating to protect the undercarriage from rust.
- Touch-Up Paint: Repair any scratches or chips in the paint immediately to prevent rust from forming.
- Garage Parking: Park your car in a garage or covered area to protect it from the elements.
When to Seek Professional Help
While you can often remove surface rust on car yourself, there are times when it’s best to seek professional help. If the rust is extensive, deep, or has affected structural components of the car, it’s best to take it to a professional auto body shop. They have the tools and expertise to handle more severe rust issues and ensure the repairs are done correctly. [See also: Car Rust Repair Cost Guide]
Conclusion
Removing surface rust is a manageable task for most car owners with the right tools and knowledge. By following this comprehensive guide on how to remove surface rust on car, you can keep your vehicle looking its best and prevent more serious damage. Remember to take safety precautions, use the right materials, and follow the steps carefully. Regular maintenance and preventative measures are key to keeping rust at bay. Addressing rust promptly not only maintains your car’s appearance but also preserves its value and longevity.
