
Barbell Restoration: A Comprehensive Guide to Reviving Your Weightlifting Equipment
The barbell, a cornerstone of strength training, endures countless workouts, bearing the brunt of heavy loads and repetitive use. Over time, this essential piece of equipment can succumb to rust, oxidation, and general wear and tear. Instead of prematurely replacing a perfectly good barbell, consider the possibility of barbell restoration. This comprehensive guide provides a step-by-step approach to revitalizing your barbell, extending its lifespan, and saving you money. We’ll explore the necessary tools, techniques, and preventative measures to keep your barbell in optimal condition for years to come. Effective barbell restoration not only improves the aesthetics of your gym but also ensures the safety and performance of your weightlifting sessions.
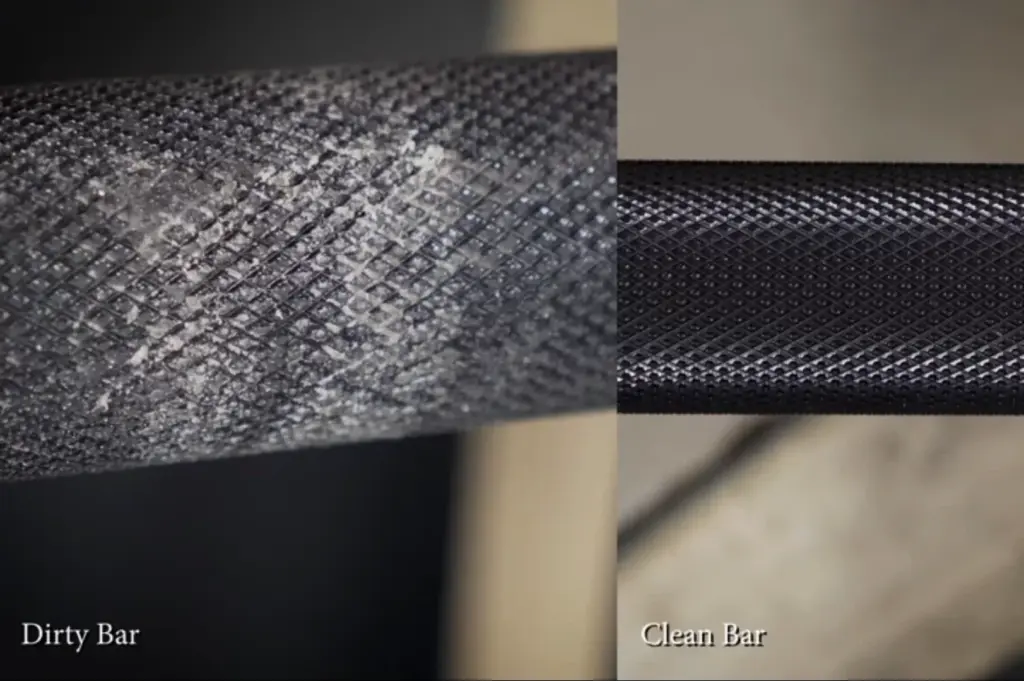
Why Restore Your Barbell?
Before diving into the restoration process, it’s crucial to understand the benefits of barbell restoration. Several compelling reasons justify the effort involved:
- Cost Savings: Replacing a barbell can be a significant expense. Restoration is a far more economical option, allowing you to reuse your existing equipment.
- Extending Lifespan: Proper restoration can significantly extend the lifespan of your barbell, potentially adding years of reliable service.
- Improved Performance: A clean and well-maintained barbell provides a smoother and more consistent lifting experience. Rust and grime can create friction, hindering your performance.
- Enhanced Safety: Rust and pitting can weaken the structural integrity of the barbell, increasing the risk of bending or breaking under heavy loads. Restoration helps ensure the barbell remains safe for use.
- Aesthetics: A restored barbell looks and feels better, contributing to a more positive and motivating workout environment.
Assessing the Condition of Your Barbell
The first step in barbell restoration is a thorough assessment of its condition. This will help you determine the extent of the restoration required and the appropriate tools and techniques to use. Examine the barbell closely, paying attention to the following areas:
- Rust: Identify areas of rust, noting the severity and extent. Surface rust is typically easier to remove than deep pitting rust.
- Oxidation: Look for signs of oxidation, which can appear as a dull or discolored finish.
- Knurling: Check the knurling for wear, damage, or buildup of chalk and grime.
- Sleeves: Inspect the sleeves for smooth rotation and any signs of damage or corrosion.
- Overall Straightness: Roll the barbell on a flat surface to check for any bends or warps. If the barbell is significantly bent, restoration may not be feasible.
Tools and Materials Needed for Barbell Restoration
Having the right tools and materials is essential for successful barbell restoration. Here’s a list of commonly used items:
- Wire Brush: A stiff wire brush is used to remove loose rust and debris. Consider both steel and nylon brushes for different levels of abrasion.
- Nylon Brush: A nylon brush is gentler than a wire brush and is suitable for cleaning the knurling and removing stubborn chalk buildup.
- Cleaning Solution: Choose a suitable cleaning solution for removing rust and grime. Options include white vinegar, WD-40, or specialized rust removers.
- Rust Converter: A rust converter transforms existing rust into a stable, paintable surface.
- Sandpaper: Various grits of sandpaper (e.g., 120, 220, 400) can be used to smooth out rough surfaces and remove stubborn rust.
- Steel Wool: Fine steel wool is helpful for polishing and removing light rust.
- Protective Gloves and Eye Protection: Always wear gloves and eye protection to protect yourself from chemicals and debris.
- Lint-Free Cloths: Use lint-free cloths to wipe down the barbell after cleaning and polishing.
- Oil or Lubricant: Apply a light coat of oil or lubricant to protect the barbell from future rust and corrosion. Options include 3-in-1 oil or specialized barbell oils.
- (Optional) Drill with Wire Brush Attachment: A drill with a wire brush attachment can speed up the rust removal process, but use caution to avoid damaging the barbell.
Step-by-Step Barbell Restoration Process
Follow these steps to effectively restore your barbell:
Cleaning the Barbell
Begin by thoroughly cleaning the barbell to remove loose dirt, chalk, and grime. Use a nylon brush and a mild cleaning solution to scrub the entire surface of the barbell, including the knurling and sleeves. Rinse with water and dry completely with a lint-free cloth.
Removing Rust
Once the barbell is clean, focus on removing rust. For surface rust, use a wire brush to scrub the affected areas. Apply moderate pressure and work in a back-and-forth motion. For more stubborn rust, consider using sandpaper or steel wool. Start with a coarser grit and gradually move to finer grits to avoid scratching the barbell. If you’re using a drill with a wire brush attachment, be careful not to apply too much pressure, which could damage the knurling. You can also try applying a rust remover, allowing it to sit for the recommended time, and then scrubbing with a wire brush. A key part of barbell restoration is patience.
Treating Deep Rust Pitting
If the barbell has deep rust pitting, you may need to use a rust converter. Apply the rust converter according to the manufacturer’s instructions. The rust converter will transform the existing rust into a stable, paintable surface, preventing further corrosion. After the rust converter has dried, you can lightly sand the area to smooth it out.
Cleaning the Knurling
The knurling is a critical part of the barbell, providing grip during lifts. Over time, chalk and grime can accumulate in the knurling, reducing its effectiveness. Use a nylon brush and a cleaning solution to thoroughly clean the knurling. Work the brush back and forth to remove any buildup. For stubborn buildup, you can use a small amount of WD-40 or a specialized knurling cleaner. Be sure to dry the knurling completely after cleaning.
Lubricating the Sleeves
The sleeves of the barbell should rotate smoothly to allow for proper weight distribution during lifts. If the sleeves are stiff or squeaky, they may need lubrication. Apply a few drops of oil or lubricant to the area where the sleeves connect to the barbell. Rotate the sleeves to distribute the lubricant evenly. Wipe away any excess lubricant with a lint-free cloth.
Protecting the Barbell
After restoring the barbell, it’s important to protect it from future rust and corrosion. Apply a light coat of oil or lubricant to the entire surface of the barbell. This will create a protective barrier against moisture and prevent rust from forming. Reapply the oil or lubricant regularly, especially if you live in a humid environment. Proper maintenance is vital for long-term barbell restoration success.
Preventative Measures to Prolong Barbell Life
Prevention is always better than cure. Here are some preventative measures to prolong the life of your barbell:
- Wipe Down After Each Use: Wipe down the barbell with a clean cloth after each workout to remove sweat and chalk.
- Store Properly: Store the barbell in a dry place, away from moisture and humidity.
- Use a Barbell Jack: Use a barbell jack to load and unload weights, reducing wear and tear on the sleeves.
- Avoid Dropping the Barbell: Dropping the barbell can damage the knurling and potentially bend the barbell.
- Regularly Clean the Knurling: Clean the knurling regularly to prevent chalk and grime buildup.
- Apply Oil or Lubricant: Apply a light coat of oil or lubricant regularly to protect the barbell from rust and corrosion.
When to Consider Professional Barbell Restoration
While DIY barbell restoration can be effective for minor rust and wear, there are situations where professional restoration may be necessary. If the barbell has significant bending, deep pitting rust, or damaged sleeves, professional restoration may be the best option. Professional restorers have the tools and expertise to repair and restore barbells to their original condition. They can also provide specialized services such as re-chroming or re-knurling.
Conclusion: Maintaining Your Investment
Barbell restoration is a worthwhile investment that can save you money, extend the lifespan of your equipment, and improve your lifting experience. By following the steps outlined in this guide and implementing preventative measures, you can keep your barbell in optimal condition for years to come. Remember to assess the condition of your barbell regularly and address any issues promptly. Whether you choose to restore your barbell yourself or seek professional assistance, taking care of your equipment is essential for maximizing its value and ensuring your safety. [See also: Choosing the Right Barbell for Your Needs] [See also: Home Gym Maintenance Checklist]
