Essential Disc Brake Maintenance: Keeping Your Ride Smooth and Safe
Disc brakes are a cornerstone of modern vehicle safety, offering superior stopping power and performance compared to traditional drum brakes. However, like any mechanical system, disc brakes require regular maintenance to ensure optimal functionality and longevity. Neglecting disc brake maintenance can lead to diminished braking performance, increased wear and tear, and potentially dangerous situations. This article provides a comprehensive guide to disc brake maintenance, covering everything from routine inspections to more involved repairs, ensuring your ride remains smooth and safe.
Understanding Disc Brake Systems
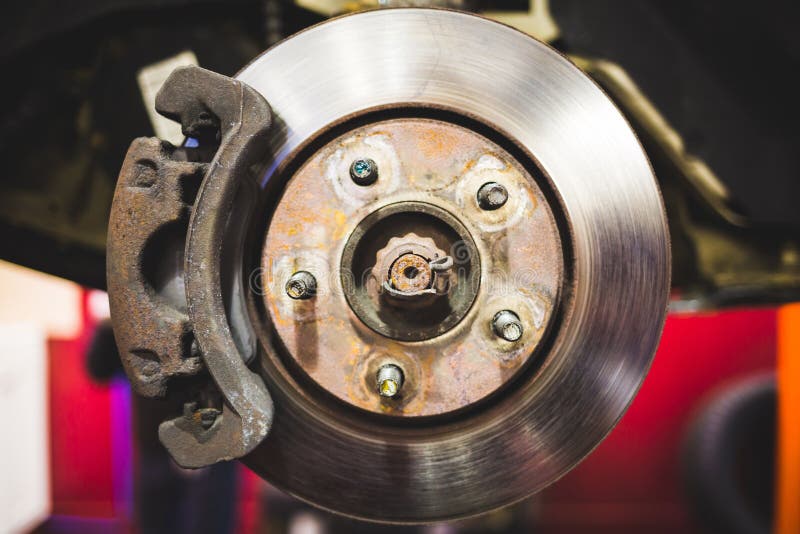
Before diving into disc brake maintenance, it’s crucial to understand the basic components and how they work together. A typical disc brake system consists of the following:
- Brake Rotor (Disc): A metal disc attached to the wheel hub that rotates with the wheel.
- Calipers: Housing containing brake pistons and brake pads, which clamp onto the rotor to slow or stop the wheel.
- Brake Pads: Friction material that presses against the rotor to create friction and slow the vehicle.
- Brake Lines: Hoses that transmit hydraulic pressure from the master cylinder to the calipers.
- Master Cylinder: A reservoir and pump that supplies brake fluid to the brake lines.
- Brake Fluid: A hydraulic fluid that transmits pressure from the master cylinder to the calipers.
When you press the brake pedal, the master cylinder forces brake fluid through the brake lines to the calipers. This pressure causes the pistons in the calipers to push the brake pads against the rotor, creating friction and slowing the wheel. Understanding this process is essential for effective disc brake maintenance.
Regular Inspection: The First Line of Defense
Regular inspection is the cornerstone of effective disc brake maintenance. A visual inspection should be performed at least every six months or every 6,000 miles, whichever comes first. Here’s what to look for:
Brake Pad Wear
Brake pads are a wear item and will eventually need to be replaced. Check the thickness of the brake pads. Most brake pads have a wear indicator or a slot that indicates when they need to be replaced. If the pad material is worn down to the wear indicator or less than 1/8 inch thick, it’s time for replacement. Uneven wear on the pads can indicate issues with the caliper or rotor.
Rotor Condition
Inspect the rotors for signs of damage, such as:
- Scoring: Deep grooves or scratches on the rotor surface.
- Rust: Surface rust is normal, but excessive rust can indicate a problem.
- Cracks: Any cracks in the rotor are a serious safety concern and require immediate replacement.
- Warping: Rotors can warp over time due to heat and stress. Warped rotors can cause vibrations or pulsations when braking.
If you notice any of these issues, it may be time to resurface or replace the rotors. Proper disc brake maintenance includes timely rotor inspection.
Brake Line Condition
Inspect the brake lines for leaks, cracks, or bulges. Any damage to the brake lines can compromise the braking system and should be addressed immediately. Pay close attention to the fittings where the brake lines connect to the calipers and master cylinder. Look for signs of fluid leakage. Replacing old or damaged brake lines is a critical aspect of disc brake maintenance.
Brake Fluid Level and Condition
Check the brake fluid level in the master cylinder reservoir. The fluid level should be between the minimum and maximum lines. If the fluid level is low, it could indicate a leak in the system. Also, inspect the brake fluid for contamination. Brake fluid can absorb moisture over time, which can reduce its effectiveness and cause corrosion within the brake system. Dark or murky brake fluid should be flushed and replaced. Regular brake fluid checks are integral to disc brake maintenance.
Brake Pad Replacement: A Step-by-Step Guide
Replacing brake pads is a common disc brake maintenance task that many DIY enthusiasts can handle. Here’s a step-by-step guide:
- Gather Your Tools: You’ll need a socket set, wrench set, brake pad spreader or C-clamp, brake cleaner, new brake pads, and safety glasses.
- Loosen the Lug Nuts: Before lifting the vehicle, loosen the lug nuts on the wheel you’ll be working on.
- Lift the Vehicle: Use a jack to lift the vehicle and secure it with jack stands. Never work under a vehicle supported only by a jack.
- Remove the Wheel: Remove the lug nuts and take off the wheel.
- Remove the Caliper: Locate the caliper bolts and remove them. Carefully slide the caliper off the rotor. Be careful not to damage the brake line.
- Remove the Old Brake Pads: Slide the old brake pads out of the caliper. Note the orientation of the pads for reinstallation.
- Compress the Caliper Piston: Use a brake pad spreader or C-clamp to compress the caliper piston back into the caliper. This creates space for the new, thicker brake pads.
- Install the New Brake Pads: Slide the new brake pads into the caliper, ensuring they are properly seated.
- Reinstall the Caliper: Carefully slide the caliper back onto the rotor and reinstall the caliper bolts. Tighten the bolts to the manufacturer’s specifications.
- Reinstall the Wheel: Put the wheel back on and tighten the lug nuts.
- Lower the Vehicle: Lower the vehicle back to the ground and torque the lug nuts to the manufacturer’s specifications.
- Repeat on the Other Side: Repeat the process on the other wheel if necessary.
- Pump the Brakes: Before driving, pump the brake pedal several times to seat the brake pads against the rotors.
- Test Drive: Take the vehicle for a test drive to ensure the brakes are working properly.
Always consult your vehicle’s repair manual for specific instructions and torque specifications. If you are not comfortable performing this task, it’s best to take your vehicle to a qualified mechanic. This process is a critical part of disc brake maintenance.
Brake Fluid Flush: Maintaining Hydraulic Integrity
Brake fluid is hygroscopic, meaning it absorbs moisture from the air. This moisture can corrode internal brake components and reduce the fluid’s boiling point, leading to brake fade. A brake fluid flush is an essential part of disc brake maintenance and should be performed every two to three years, or as recommended by your vehicle’s manufacturer.
Here’s a simplified overview of the brake fluid flushing process:
- Gather Your Supplies: You’ll need new brake fluid (DOT 3 or DOT 4, as specified by your vehicle’s manufacturer), a wrench to open the bleeder screws, a clear hose, a container to collect the old fluid, and an assistant.
- Locate the Bleeder Screws: The bleeder screws are located on the calipers.
- Start with the Farthest Caliper: Begin with the caliper farthest from the master cylinder (usually the rear passenger side).
- Attach the Hose: Attach the clear hose to the bleeder screw and place the other end of the hose in the container.
- Open the Bleeder Screw: Have your assistant slowly pump the brake pedal several times and hold it down. While the pedal is held down, open the bleeder screw. Old brake fluid will flow into the container.
- Close the Bleeder Screw: Close the bleeder screw before your assistant releases the brake pedal.
- Repeat: Repeat steps 5 and 6 until fresh brake fluid flows out of the bleeder screw.
- Check the Master Cylinder: Regularly check the brake fluid level in the master cylinder reservoir and add new fluid as needed. Never let the reservoir run dry.
- Repeat on Other Calipers: Repeat the process on the remaining calipers, working your way closer to the master cylinder.
- Test the Brakes: After flushing the brake fluid, pump the brake pedal several times to ensure the brakes are working properly. Take the vehicle for a test drive.
Brake fluid flushing requires careful attention to detail. If you’re not comfortable performing this task, it’s best to seek professional assistance. Regular brake fluid flushes are crucial for effective disc brake maintenance.
Rotor Resurfacing or Replacement
If your rotors are scored, warped, or excessively rusty, they may need to be resurfaced or replaced. Resurfacing involves machining the rotor surface to remove imperfections and restore a smooth, flat surface. However, rotors can only be resurfaced a limited number of times before they become too thin. Replacing the rotors is often the best option if they are severely damaged or have been resurfaced multiple times.
The decision to resurface or replace rotors depends on several factors, including:
- Rotor Thickness: Check the rotor thickness against the manufacturer’s specifications. If the rotor is below the minimum thickness, it must be replaced.
- Damage: Severely damaged rotors should be replaced.
- Cost: Resurfacing is typically less expensive than replacement, but the cost difference may be minimal.
When replacing rotors, it’s important to use high-quality rotors that meet or exceed the original equipment specifications. Always replace rotors in pairs to ensure even braking performance. Rotor maintenance is a vital component of overall disc brake maintenance.
Addressing Common Disc Brake Problems
Even with regular disc brake maintenance, you may encounter some common problems. Here are a few issues and how to address them:
- Squealing Brakes: Squealing brakes are often caused by worn brake pads or glazed rotors. Replacing the brake pads or resurfacing the rotors can usually resolve this issue.
- Grinding Brakes: Grinding brakes indicate that the brake pads are worn down to the metal backing plate and are damaging the rotors. Immediate replacement of the brake pads and rotors is necessary.
- Pulsating Brakes: Pulsating brakes are typically caused by warped rotors. Resurfacing or replacing the rotors can eliminate the pulsation.
- Spongy Brake Pedal: A spongy brake pedal can be caused by air in the brake lines or a leak in the system. Bleeding the brakes or repairing the leak can restore a firm brake pedal.
- Brake Fade: Brake fade occurs when the brakes overheat and lose their effectiveness. This can be caused by worn brake pads, contaminated brake fluid, or excessive braking. Allowing the brakes to cool down, replacing worn components, or flushing the brake fluid can help prevent brake fade.
The Importance of Professional Assistance
While many disc brake maintenance tasks can be performed by DIY enthusiasts, some repairs are best left to professionals. If you are not comfortable working on your brakes, or if you encounter a complex problem, it’s always best to seek the assistance of a qualified mechanic. A professional mechanic has the tools, knowledge, and experience to properly diagnose and repair brake problems, ensuring your safety and the longevity of your braking system.
Conclusion
Disc brake maintenance is essential for ensuring the safety and reliability of your vehicle. Regular inspections, timely brake pad replacements, brake fluid flushes, and rotor maintenance can help prevent costly repairs and ensure optimal braking performance. By following the guidelines outlined in this article, you can keep your disc brakes in top condition and enjoy a smooth and safe ride. Remember, neglecting your brakes can have serious consequences. Prioritize regular disc brake maintenance to protect yourself and others on the road. [See also: Brake Pad Replacement Cost] [See also: How to Bleed Brakes] [See also: Signs of Worn Brake Rotors]
