
Essential Tools Needed to Change Brake Rotors: A Comprehensive Guide
Changing your brake rotors is a crucial part of vehicle maintenance. While it might seem daunting, with the right tools and a bit of know-how, it’s a task many DIY enthusiasts can tackle. Having the correct tools needed to change brake rotors not only makes the job easier but also ensures safety and proper function of your braking system. This comprehensive guide will walk you through the essential tools you’ll need, providing insights into why each tool is important and how to use it effectively.
Understanding the Importance of Proper Brake Maintenance
Before diving into the tools needed to change brake rotors, let’s quickly discuss why this maintenance task is so vital. Brakes are your car’s primary safety system. Worn or damaged brake rotors can significantly reduce your braking effectiveness, increasing stopping distances and putting you and others at risk. Regular inspection and replacement of brake rotors are crucial for maintaining optimal vehicle safety and performance. Ignoring worn brakes can lead to more costly repairs down the line, including damage to calipers and other braking components.
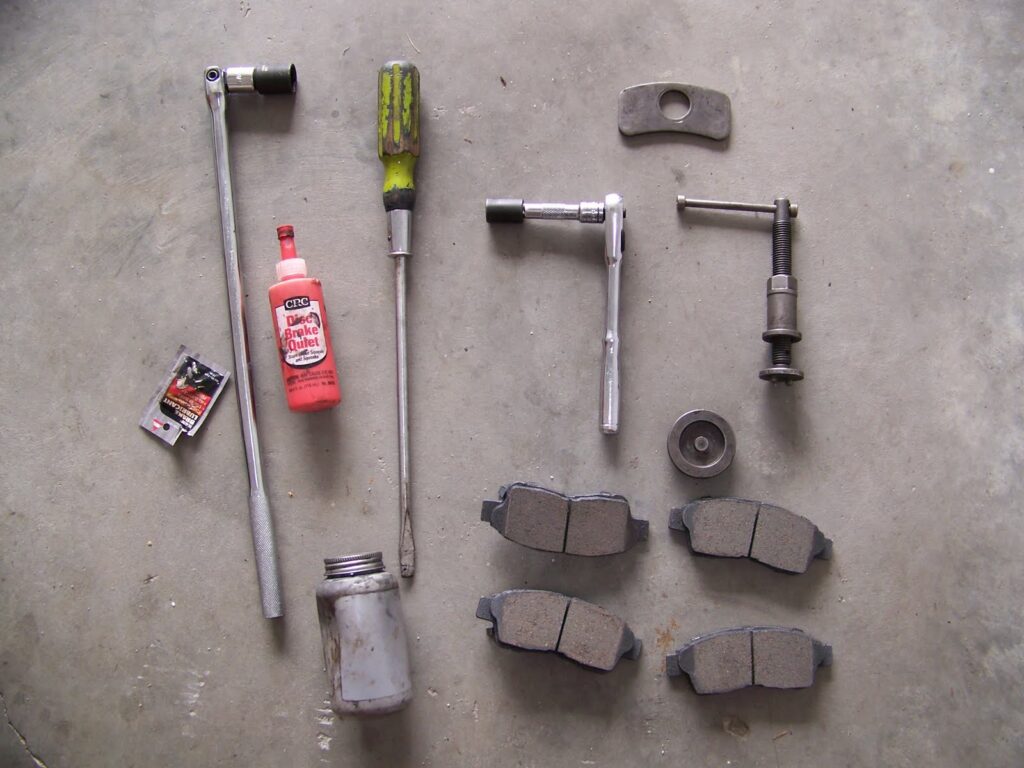
The Essential Toolkit: Tools Needed to Change Brake Rotors
Now, let’s get into the specifics. Here’s a detailed list of the tools needed to change brake rotors, along with explanations of their purpose:
1. Socket Set and Wrenches
A comprehensive socket set and wrench set are fundamental. You’ll need these to remove the wheels, caliper bolts, and potentially other components depending on your vehicle. Metric sizes are most common for modern vehicles. Look for a set that includes a variety of sizes to ensure you have the right tool for the job.
2. Torque Wrench
A torque wrench is non-negotiable. Over-tightening or under-tightening bolts can lead to serious problems. A torque wrench allows you to tighten fasteners to the manufacturer’s specified torque settings, ensuring proper clamping force and preventing damage. Make sure your torque wrench covers the range of torque values required for your vehicle’s brake components.
3. Brake Caliper Compressor Tool
This tool is essential for retracting the caliper piston back into the caliper housing. There are two main types: a C-clamp style and a screw-type compressor. The screw-type compressor is generally preferred as it provides more even pressure and reduces the risk of damaging the piston. For vehicles with electronic parking brakes, a scan tool may be required to retract the rear calipers.
4. Brake Cleaner
Brake cleaner is used to clean the new brake rotors and other brake components before installation. It removes oils and contaminants that can affect braking performance. Always use a brake cleaner specifically designed for brake systems, as other cleaners may leave residues that can damage brake components.
5. Wheel Chocks
Safety first! Wheel chocks are essential for preventing the vehicle from rolling while you’re working on the brakes. Place them behind the wheels that are not being worked on. This is a simple but critical safety measure.
6. Jack and Jack Stands
You’ll need a jack to lift the vehicle and jack stands to support it safely. Never work under a vehicle supported only by a jack. Jack stands provide a stable and secure platform for working on the brakes. Make sure the jack stands are rated for the weight of your vehicle and are placed on solid, level ground.
7. Lug Wrench
A lug wrench is used to loosen and tighten the lug nuts that hold the wheels onto the vehicle. A four-way lug wrench provides more leverage than a standard lug wrench, making it easier to remove stubborn lug nuts. Consider investing in a breaker bar for even more leverage.
8. Hammer (Rubber Mallet)
Sometimes, the brake rotor can be stuck to the hub due to rust or corrosion. A rubber mallet can be used to gently tap the rotor and loosen it. Avoid using a metal hammer directly on the rotor, as this can damage it. The rubber mallet provides a softer impact that is less likely to cause damage.
9. Screwdrivers (Various Sizes)
A set of screwdrivers, both flathead and Phillips head, can be useful for various tasks, such as removing brake hardware or adjusting brake components. Having a variety of sizes ensures you’ll have the right tool for any screws or fasteners you encounter.
10. Penetrating Oil
Penetrating oil can be used to loosen rusted or corroded bolts and fasteners. Apply it to the affected areas and let it sit for a few minutes before attempting to remove the bolts. This can save you a lot of frustration and prevent you from breaking bolts.
11. Wire Brush
A wire brush is helpful for cleaning rust and corrosion from the hub and other brake components. Cleaning these surfaces ensures proper contact between the new rotor and the hub, which is essential for proper braking performance.
12. Gloves and Safety Glasses
Protect yourself! Wear gloves to protect your hands from grease and grime, and wear safety glasses to protect your eyes from debris. Brake dust can be harmful, so it’s important to take precautions to protect yourself.
Step-by-Step Guide to Changing Brake Rotors
Once you have all the tools needed to change brake rotors, you can begin the replacement process. Here’s a simplified step-by-step guide:
- Loosen the Lug Nuts: Before lifting the vehicle, loosen the lug nuts on the wheel you’ll be working on.
- Lift and Secure the Vehicle: Use a jack to lift the vehicle and place jack stands under the frame for support. Never work under a vehicle supported only by a jack.
- Remove the Wheel: Remove the lug nuts completely and take off the wheel.
- Remove the Caliper: Disconnect the brake line (if necessary) and remove the caliper bolts. Carefully remove the caliper and secure it out of the way, ensuring the brake line is not stretched or damaged.
- Remove the Brake Pads: Take out the old brake pads. Note their orientation for reinstallation.
- Remove the Brake Rotor: If the rotor is stuck, use a rubber mallet to gently tap it until it comes loose.
- Clean the Hub: Use a wire brush to clean any rust or corrosion from the hub.
- Install the New Rotor: Place the new rotor onto the hub, ensuring it sits flush.
- Reinstall the Caliper and Brake Pads: Reinstall the brake pads and caliper, tightening the caliper bolts to the manufacturer’s specified torque.
- Reinstall the Wheel: Put the wheel back on and tighten the lug nuts by hand.
- Lower the Vehicle: Lower the vehicle and use a torque wrench to tighten the lug nuts to the correct torque specification.
- Repeat for Other Wheels: Repeat the process for the other wheels if necessary.
- Test the Brakes: Pump the brake pedal several times to ensure the brakes are working properly. Take the vehicle for a test drive in a safe area to verify braking performance.
Choosing the Right Brake Rotors
Selecting the right brake rotors is just as important as having the right tools needed to change brake rotors. Consider the following factors when choosing new rotors:
- Vehicle Compatibility: Ensure the rotors are specifically designed for your vehicle’s make, model, and year.
- Material: Rotors are typically made from cast iron or steel. High-performance vehicles may use ceramic or carbon-ceramic rotors.
- Type: There are several types of rotors, including solid, vented, drilled, and slotted. Vented rotors provide better cooling, while drilled and slotted rotors offer improved braking performance in wet conditions.
- Brand Reputation: Choose rotors from a reputable brand known for quality and reliability.
Safety Precautions When Changing Brake Rotors
Working on brakes involves certain risks. Always follow these safety precautions:
- Wear Safety Gear: Always wear gloves and safety glasses to protect yourself from brake dust and debris.
- Use Jack Stands: Never work under a vehicle supported only by a jack.
- Disconnect the Battery: Disconnecting the battery can prevent accidental electrical shorts.
- Dispose of Brake Fluid Properly: Brake fluid is toxic and should be disposed of properly.
- Follow Torque Specifications: Always tighten bolts to the manufacturer’s specified torque settings.
Troubleshooting Common Brake Rotor Replacement Issues
Even with the right tools needed to change brake rotors, you might encounter some common issues:
- Stuck Rotors: Use penetrating oil and a rubber mallet to loosen stuck rotors.
- Stripped Bolts: Use a bolt extractor to remove stripped bolts.
- Brake Squeal: Apply brake lubricant to the back of the brake pads to reduce squealing.
- Uneven Braking: Ensure the brake rotors are properly seated and the brake system is properly bled.
Conclusion
Changing your brake rotors is a manageable task with the right tools needed to change brake rotors and a bit of patience. By following this guide and taking the necessary safety precautions, you can save money and gain valuable experience in vehicle maintenance. Remember to always prioritize safety and consult a professional mechanic if you’re unsure about any step of the process. Investing in quality tools and understanding the proper procedures will ensure a safe and effective brake rotor replacement. [See also: How to Inspect Your Brakes] Regular maintenance, including brake rotor replacement, is key to keeping your vehicle running safely and efficiently.
