How to Clean a Carburetor Without Removing It: A Step-by-Step Guide
A dirty carburetor can cause a host of problems for your engine, from poor performance and reduced fuel efficiency to stalling and difficulty starting. While a complete carburetor disassembly and cleaning is sometimes necessary, you can often address minor issues by cleaning the carburetor without removing it from the engine. This guide provides a comprehensive, step-by-step approach to how to clean a carburetor without removing it, saving you time and effort.
Understanding Carburetor Function and Common Issues
Before diving into the cleaning process, it’s essential to understand what a carburetor does and why it gets dirty. A carburetor’s primary function is to mix air and fuel in the correct proportions to create a combustible mixture for the engine. Over time, varnish, gum, and other deposits can build up inside the carburetor, restricting fuel flow and disrupting the air-fuel mixture. This build-up is often caused by fuel degradation, especially when vehicles are stored for extended periods.
Common symptoms of a dirty carburetor include:
- Rough idling
- Hesitation during acceleration
- Poor fuel economy
- Stalling
- Difficulty starting
- Black smoke from the exhaust (indicating a rich mixture)
Tools and Materials Needed
To effectively clean a carburetor without removing it, you’ll need the following tools and materials:
- Carburetor cleaner spray
- Safety glasses
- Gloves
- Screwdrivers (Phillips and flathead)
- Wrench set
- Clean rags
- Funnel
- Fuel stabilizer (optional)
Step-by-Step Guide: Cleaning Your Carburetor In-Place
Step 1: Safety First
Before starting any work on your engine, ensure your safety. Wear safety glasses and gloves to protect your eyes and skin from carburetor cleaner and fuel. Work in a well-ventilated area, as carburetor cleaner fumes can be harmful. Disconnect the negative battery cable to prevent accidental sparks.
Step 2: Locate the Carburetor
The carburetor is typically located on top of the engine, connected to the intake manifold. Refer to your vehicle’s service manual if you’re unsure of its location. Identify the carburetor’s components, including the throttle linkage, choke, and fuel lines.
Step 3: Prepare the Engine
Start the engine and let it warm up to operating temperature. This will help loosen any deposits inside the carburetor. Once the engine is warm, turn it off.
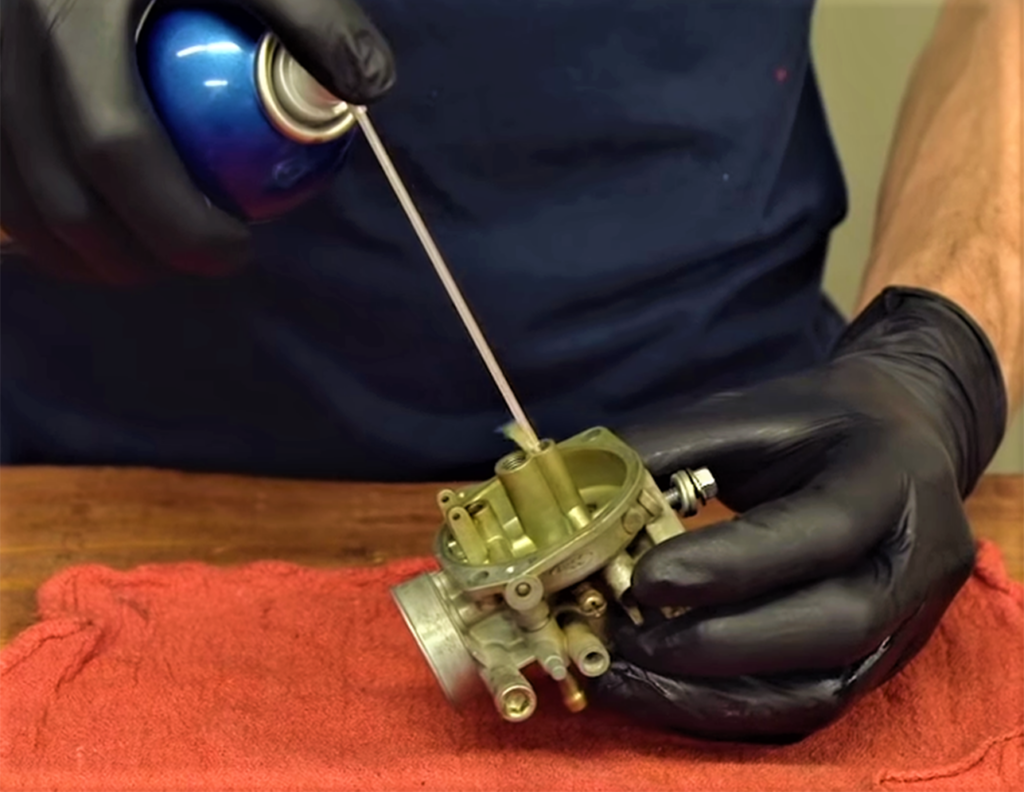
Step 4: Spray Carburetor Cleaner into the Air Intake
With the engine off, remove the air cleaner assembly. This will expose the carburetor’s air intake. Start the engine again. With the engine idling (it might idle roughly), spray carburetor cleaner directly into the carburetor’s throat. Use short bursts to avoid flooding the engine. You should see black smoke coming from the exhaust as the cleaner burns off the deposits. Continue spraying until the engine runs smoother.
Step 5: Clean the Linkages and External Components
Spray carburetor cleaner onto the throttle linkage, choke linkage, and other external components. Use a clean rag to wipe away any dirt and grime. Ensure that all linkages move freely.
Step 6: Check and Clean the Idle Mixture Screws
Locate the idle mixture screws on the carburetor. These screws control the air-fuel mixture at idle. Refer to your vehicle’s service manual for the correct settings. Gently turn the screws in until they are lightly seated, then back them out to the manufacturer’s recommended setting. Spray carburetor cleaner around the screws to remove any deposits. [See also: Adjusting Carburetor Idle Mixture]
Step 7: Use a Fuel Additive (Optional)
After cleaning the carburetor, consider adding a fuel additive to your fuel tank. Fuel additives can help to further clean the fuel system and prevent future deposits from forming. Follow the instructions on the fuel additive bottle.
Step 8: Reassemble and Test
Reinstall the air cleaner assembly. Start the engine and let it idle for a few minutes. Check for any leaks or unusual noises. Take the vehicle for a test drive to see if the cleaning has improved its performance. If the problem persists, you may need to consider removing and thoroughly cleaning the carburetor.
Tips for Preventing Carburetor Problems
Preventing carburetor problems is easier than fixing them. Here are a few tips to keep your carburetor clean and running smoothly:
- Use fresh, high-quality fuel.
- Add fuel stabilizer to the fuel tank when storing your vehicle for extended periods.
- Regularly inspect and replace your fuel filter.
- Avoid letting your vehicle sit for long periods without being driven.
- Consider using a fuel system cleaner periodically.
When to Consider Professional Help
While cleaning a carburetor without removing it can address many common issues, some problems require professional attention. If you’ve tried cleaning the carburetor and the symptoms persist, or if you’re not comfortable working on your engine, it’s best to take your vehicle to a qualified mechanic. They can diagnose the problem and perform a more thorough cleaning or rebuild of the carburetor.
Alternative Cleaning Methods
Besides using spray carburetor cleaner, some alternative methods can be employed to clean a carburetor without removing it. These include:
- Using compressed air: After spraying carburetor cleaner, use compressed air to blow out any remaining debris from the jets and passages.
- Sea Foam treatment: Sea Foam is a popular fuel additive that can help clean the entire fuel system, including the carburetor. Add it to your fuel tank according to the manufacturer’s instructions. [See also: Sea Foam Fuel Treatment Review]
- Ultrasonic cleaning (for removed carburetors): While this guide focuses on cleaning without removal, it’s worth noting that ultrasonic cleaning is the most effective method for a heavily clogged carburetor. This requires removal and disassembly.
Troubleshooting Common Issues After Cleaning
Even after cleaning a carburetor without removing it, you might encounter some lingering issues. Here’s how to troubleshoot them:
- Engine still idles rough: Re-adjust the idle mixture screws. Ensure they are set to the manufacturer’s recommended specifications.
- Hesitation persists: Check for vacuum leaks. A vacuum leak can disrupt the air-fuel mixture and cause hesitation.
- Poor fuel economy remains: Inspect the fuel lines and fuel pump for any issues. Also, ensure the choke is operating correctly.
Conclusion
Cleaning a carburetor without removing it is a valuable skill for any car owner. By following these steps and tips, you can often resolve common carburetor problems and improve your engine’s performance. Remember to prioritize safety, use the right tools and materials, and consult a professional if you’re unsure about any step. Regular maintenance and preventative measures will help keep your carburetor clean and your engine running smoothly for years to come. The process of how to clean a carburetor without removing it is a cost-effective solution to many performance issues. Always remember to consult your vehicle’s manual for specific instructions related to your make and model.
