How to Fix Car Door Weather Stripping: A Comprehensive Guide
Car door weather stripping plays a crucial role in maintaining the integrity of your vehicle’s interior. It acts as a barrier against the elements, reducing wind noise, preventing water leaks, and insulating against temperature fluctuations. Over time, however, weather stripping can degrade due to exposure to sun, rain, and general wear and tear. Knowing how to fix car door weather stripping is an essential skill for any car owner looking to maintain their vehicle’s condition and comfort. This guide provides a detailed, step-by-step approach to repairing and replacing weather stripping, ensuring a proper seal and extending the life of your car.
Understanding Car Door Weather Stripping
Before diving into the repair process, it’s important to understand what weather stripping is and why it’s important. Weather stripping, typically made of rubber or foam, is installed around the edges of car doors, windows, and other openings. Its primary functions include:
- Sealing: Prevents water, dust, and debris from entering the vehicle.
- Insulation: Helps maintain a consistent interior temperature by preventing drafts and air leaks.
- Noise Reduction: Reduces wind noise and external sounds, creating a quieter cabin.
- Protection: Protects the door frame and body from damage caused by friction and impact.
When weather stripping fails, these functions are compromised, leading to potential problems such as water damage, increased road noise, and decreased fuel efficiency due to increased HVAC usage. Therefore, addressing damaged car door weather stripping promptly is crucial.
Identifying Weather Stripping Problems
Recognizing the signs of damaged weather stripping is the first step in addressing the issue. Common indicators include:
- Visible Cracks or Tears: Inspect the weather stripping for any visible damage, such as cracks, tears, or dry rot.
- Stiffness or Brittleness: Over time, weather stripping can become stiff and brittle, losing its flexibility and sealing ability.
- Water Leaks: Water entering the cabin, especially during rain or car washes, is a clear sign of compromised weather stripping.
- Increased Wind Noise: Noticeably louder wind noise while driving can indicate gaps in the weather stripping.
- Drafts: Feeling drafts around the door or window edges suggests that the seal is no longer effective.
Regular inspection of your car door weather stripping can help you identify problems early and prevent further damage.
Tools and Materials Needed
Before starting the repair or replacement process, gather the necessary tools and materials. This will ensure a smooth and efficient workflow. Here’s a list of essentials:
- New Weather Stripping: Purchase replacement weather stripping that is specifically designed for your car’s make and model. Universal weather stripping can be used, but a precise fit is crucial for optimal sealing.
- Cleaning Supplies: Soap, water, and a clean cloth for cleaning the area before applying new weather stripping.
- Adhesive Remover: To remove any old adhesive residue.
- Adhesive: Automotive-grade adhesive designed for rubber or foam. Ensure it’s compatible with the type of weather stripping you’re using.
- Putty Knife or Scraper: For removing old weather stripping and adhesive.
- Scissors or Utility Knife: For trimming the new weather stripping to the correct length.
- Gloves: To protect your hands from adhesive and cleaning chemicals.
- Heat Gun or Hair Dryer (Optional): To soften old adhesive for easier removal.
- Roller or Applicator: To ensure the new weather stripping is securely attached.
Having these tools and materials on hand will make the process of fixing your car door weather stripping much easier.
Step-by-Step Guide to Fixing Car Door Weather Stripping
Follow these steps to effectively repair or replace your car door weather stripping:
Step 1: Remove the Old Weather Stripping
Carefully remove the old weather stripping. Use a putty knife or scraper to gently pry it away from the door frame. If the adhesive is stubborn, use a heat gun or hair dryer to soften it. Be careful not to damage the paint or underlying surface. Work slowly and methodically to avoid tearing the weather stripping into small pieces, which can make removal more difficult.
Step 2: Clean the Surface
Thoroughly clean the area where the new weather stripping will be installed. Remove any remaining adhesive residue using an adhesive remover. Wipe the surface with soap and water to remove any dirt, grease, or debris. Allow the surface to dry completely before proceeding to the next step. A clean surface is essential for proper adhesion of the new car door weather stripping.
Step 3: Measure and Cut the New Weather Stripping
Measure the length of the area where the weather stripping will be installed. Use scissors or a utility knife to cut the new weather stripping to the correct length. It’s better to cut it slightly longer than necessary, as you can always trim off any excess later. Ensure the cut is clean and precise for a seamless fit.
Step 4: Apply Adhesive
Apply a thin, even layer of automotive-grade adhesive to the back of the new weather stripping. Also, apply a thin layer of adhesive to the door frame where the weather stripping will be attached. Allow the adhesive to become slightly tacky before proceeding. This ensures a strong and durable bond.
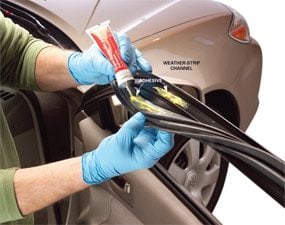
Step 5: Install the New Weather Stripping
Carefully align the new weather stripping with the door frame and press it firmly into place. Start at one end and work your way along the entire length, ensuring that the weather stripping is properly seated and aligned. Use a roller or applicator to apply even pressure and ensure a secure bond. Pay particular attention to corners and curves, as these areas are prone to lifting.
Step 6: Trim Excess Material
If there is any excess weather stripping, trim it carefully with scissors or a utility knife. Make sure the cut is clean and flush with the edge of the door frame. This will prevent the weather stripping from catching on clothing or other objects.
Step 7: Allow to Cure
Allow the adhesive to cure completely before closing the door. Refer to the adhesive manufacturer’s instructions for the recommended curing time. This will ensure that the weather stripping is securely attached and will provide a long-lasting seal. Avoid exposing the new car door weather stripping to excessive moisture or extreme temperatures during the curing process.
Tips for Maintaining Car Door Weather Stripping
Proper maintenance can extend the life of your car door weather stripping and prevent premature deterioration. Here are some tips to keep your weather stripping in good condition:
- Regular Cleaning: Clean the weather stripping regularly with soap and water to remove dirt, dust, and debris.
- Lubrication: Apply a silicone-based lubricant to the weather stripping periodically to keep it soft and pliable. This will prevent it from drying out and cracking.
- Protection from Sunlight: Park your car in a shaded area or use a car cover to protect the weather stripping from direct sunlight, which can cause it to degrade over time.
- Inspect Regularly: Check the weather stripping regularly for any signs of damage, such as cracks, tears, or stiffness. Address any issues promptly to prevent further deterioration.
By following these maintenance tips, you can ensure that your car door weather stripping remains in good condition and continues to provide a reliable seal.
When to Consider Professional Help
While fixing car door weather stripping is a manageable DIY task, there are situations where professional help may be necessary. Consider seeking professional assistance if:
- You’re Not Comfortable with DIY Repairs: If you’re not confident in your ability to perform the repair, it’s best to leave it to a professional.
- The Damage is Extensive: If the weather stripping is severely damaged or the door frame is corroded, professional repair may be required.
- You’re Having Trouble Finding the Right Replacement: A professional can help you find the correct weather stripping for your car’s make and model.
- You Want to Ensure a Perfect Seal: A professional can ensure that the weather stripping is installed correctly and provides a perfect seal.
Hiring a professional can provide peace of mind and ensure that the job is done correctly. The cost may be higher, but the long-term benefits of a properly sealed vehicle can outweigh the initial expense. Properly installed car door weather stripping prevents costly water damage and reduces energy consumption.
Conclusion
Knowing how to fix car door weather stripping is a valuable skill for any car owner. By following the steps outlined in this guide, you can effectively repair or replace your car’s weather stripping and maintain its integrity. Regular maintenance and prompt attention to damage can extend the life of your weather stripping and ensure a comfortable and protected driving experience. Whether you choose to tackle the project yourself or seek professional assistance, addressing damaged weather stripping is a crucial aspect of car care. Keeping your car door weather stripping in good repair saves money and prevents bigger problems down the road. [See also: Car Door Maintenance Tips] [See also: How to Prevent Water Leaks in Your Car] [See also: Automotive Weather Stripping Options]
