
Mastering Bicycle Hydraulic Brake Maintenance: A Comprehensive Guide
Bicycle hydraulic brakes offer superior stopping power and modulation compared to traditional mechanical brakes. However, like any sophisticated system, they require regular maintenance to ensure optimal performance and longevity. This comprehensive guide will walk you through the essential steps of bicycle hydraulic brake maintenance, covering everything from basic inspections to bleeding procedures.
Understanding Bicycle Hydraulic Brakes
Before diving into the maintenance process, it’s crucial to understand the components of a bicycle hydraulic brake system. These typically include:
- Brake Lever: Activates the system, pushing fluid through the lines.
- Master Cylinder: Located at the lever, it contains the reservoir for hydraulic fluid and the piston that pressurizes the fluid.
- Hydraulic Lines: Hoses that carry the hydraulic fluid from the master cylinder to the caliper.
- Caliper: Houses the brake pads and pistons that clamp onto the rotor.
- Brake Pads: Friction material that contacts the rotor to slow the wheel.
- Rotor: A metal disc attached to the wheel hub that the brake pads clamp onto.
- Hydraulic Fluid: The lifeblood of the system, transmitting pressure from the lever to the caliper.
Understanding these components will make the bicycle hydraulic brake maintenance process much easier.
Essential Tools for Bicycle Hydraulic Brake Maintenance
Having the right tools is essential for effective bicycle hydraulic brake maintenance. Here’s a list of what you’ll likely need:
- Brake Bleed Kit: Includes syringes, hoses, and fittings specific to your brake brand.
- Hydraulic Fluid: Use the correct type specified by your brake manufacturer (DOT or mineral oil).
- Wrenches and Allen Keys: For adjusting levers, calipers, and bleed ports.
- Brake Pad Spreader: To push pistons back into the caliper.
- Torque Wrench: To ensure bolts are tightened to the correct specifications.
- Isopropyl Alcohol: For cleaning rotors and calipers.
- Clean Rags: For wiping up spills and cleaning components.
- Gloves: To protect your hands from hydraulic fluid.
Regular Inspection and Cleaning
Regular inspection is the first line of defense in bicycle hydraulic brake maintenance. Before each ride, visually inspect the following:
- Lever Feel: The lever should feel firm and responsive, not spongy.
- Hydraulic Lines: Check for cracks, leaks, or kinks.
- Caliper: Look for leaks around the pistons and fittings.
- Brake Pads: Ensure they have sufficient thickness and are not contaminated.
- Rotor: Check for damage, warping, or contamination.
Cleaning is equally important. Use isopropyl alcohol and a clean rag to wipe down the rotors and calipers regularly. Avoid using soap or degreasers, as they can contaminate the brake pads.
Brake Pad Replacement
Brake pads wear down over time and need to be replaced. The frequency of replacement depends on riding conditions and brake pad material. Here’s how to replace them:
- Remove the wheel from the bike.
- Locate the brake pad retaining bolt or clip and remove it.
- Slide out the old brake pads.
- Inspect the caliper pistons. If they are extended, use a brake pad spreader to push them back into the caliper.
- Install the new brake pads, ensuring they are correctly oriented.
- Reinstall the retaining bolt or clip.
- Reinstall the wheel and test the brakes.
Proper bicycle hydraulic brake maintenance includes timely brake pad replacement.
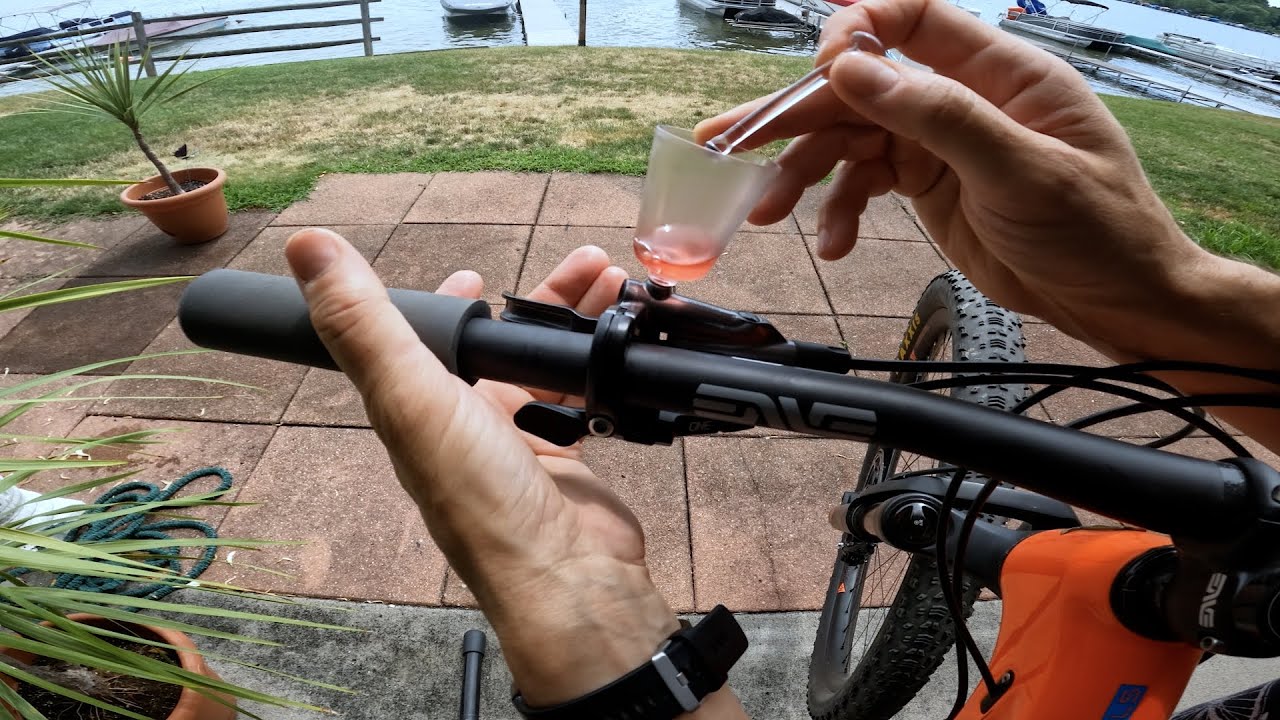
Brake Bleeding: Removing Air from the System
One of the most critical aspects of bicycle hydraulic brake maintenance is bleeding the brakes. Air bubbles in the hydraulic lines can cause a spongy lever feel and reduced braking power. Here’s a general overview of the bleeding process:
- Prepare the bike and bleed kit according to the manufacturer’s instructions.
- Attach syringes and hoses to the bleed ports on the lever and caliper.
- Open the bleed ports.
- Push fluid through the system, from the caliper to the lever, to force out air bubbles.
- Close the bleed ports.
- Remove the syringes and hoses.
- Clean up any spilled fluid.
- Test the brakes.
Important Note: The specific bleeding procedure varies depending on the brake brand and model. Always consult the manufacturer’s instructions before bleeding your brakes. Bleeding your bicycle hydraulic brake system is a crucial part of maintenance.
Adjusting Brake Levers and Calipers
Properly adjusted brake levers and calipers are essential for optimal braking performance. Here’s how to adjust them:
- Lever Reach: Adjust the lever reach to suit your hand size and riding style. This is usually done with a small Allen key.
- Caliper Alignment: Ensure the caliper is centered over the rotor. If it’s not, loosen the caliper bolts and adjust its position until the rotor runs freely between the brake pads.
These adjustments are crucial for effective bicycle hydraulic brake maintenance.
Troubleshooting Common Issues
Even with regular bicycle hydraulic brake maintenance, you may encounter some common issues:
- Spongy Lever Feel: This is usually caused by air in the hydraulic lines. Bleed the brakes.
- Brake Squeal: This can be caused by contaminated brake pads or rotors. Clean the rotors and pads with isopropyl alcohol. If the squeal persists, replace the pads.
- Leaking Fluid: This indicates a problem with the hydraulic lines, seals, or fittings. Inspect the system carefully and replace any damaged components.
- Weak Braking Power: This could be due to worn brake pads, contaminated rotors, or air in the hydraulic lines. Address each of these potential issues.
Addressing these issues promptly is key to successful bicycle hydraulic brake maintenance.
Choosing the Right Hydraulic Fluid
Using the correct hydraulic fluid is paramount for the longevity and performance of your bicycle hydraulic brake system. There are two main types of hydraulic fluid used in bicycle brakes:
- DOT Fluid: DOT (Department of Transportation) fluid is a glycol-based fluid that absorbs moisture from the air. Because of this, it needs to be replaced more frequently (typically every 6-12 months). DOT fluid is corrosive and can damage paint, so be careful when handling it.
- Mineral Oil: Mineral oil is a non-corrosive fluid that does not absorb moisture. It typically needs to be replaced less frequently than DOT fluid. However, mineral oil is not compatible with all brake systems, so it’s crucial to use the type specified by the manufacturer.
Always check your brake manufacturer’s recommendations for the correct type of hydraulic fluid. Using the wrong fluid can damage the seals and other components of your bicycle hydraulic brake system.
Preventative Maintenance Tips
Beyond the regular maintenance tasks, here are some preventative measures you can take to prolong the life of your bicycle hydraulic brakes:
- Store Your Bike Properly: Avoid storing your bike upside down, as this can cause air bubbles to migrate to the caliper.
- Protect Hydraulic Lines: Be careful not to kink or damage the hydraulic lines when transporting or storing your bike.
- Avoid Contamination: Keep oil, grease, and other contaminants away from the brake pads and rotors.
- Regular Riding: Consistent use keeps the system lubricated and prevents seals from drying out.
The Importance of Professional Service
While many bicycle hydraulic brake maintenance tasks can be performed at home, some repairs are best left to a professional mechanic. If you are not comfortable bleeding your brakes or if you suspect a more serious problem, take your bike to a qualified bike shop. A professional can diagnose and repair any issues, ensuring your brakes are functioning safely and effectively. Regular professional checkups can also extend the life of your bicycle hydraulic brake system.
Conclusion
Bicycle hydraulic brake maintenance is essential for safe and enjoyable riding. By following the steps outlined in this guide, you can keep your brakes in top condition and enjoy reliable stopping power for years to come. Remember to inspect your brakes regularly, replace worn parts promptly, and bleed the system as needed. With a little knowledge and effort, you can master bicycle hydraulic brake maintenance and keep your bike running smoothly. Proper maintenance will ensure that your bicycle hydraulic brake system continues to perform optimally. Don’t neglect your bicycle hydraulic brake maintenance!
[See also: Bicycle Brake Types and Their Maintenance]
[See also: How to Choose the Right Brake Pads for Your Bike]
[See also: Common Bicycle Repair Mistakes and How to Avoid Them]
